Before a process definition can be executed, it must be loaded into memory, and potentially combined with referenced externals. This is a two step process.
- First the process definition is loaded in an instance of ProcessDefinition. This instance maps directly to the XML process definition format.
-
Next, the
ProcessDefinitionis transformed into an instance of Graph. If the process definition has externals defined, these must already be loaded and will be imported into the newGraph.
Loading is done by an instance of
GraphLoader.
Instances of GraphLoader can be acquired from an Engine
instance. When a process definition is loaded, it will be loaded into a
GraphRepository
associated with the Engine.
There are various ways that process definitions can be loaded. The easiest is to load a single
file. Let us assume that process definitions are stored in ./process-definitions/,
and we wish to load the test process definition.
  MemEngine engine = new MemEngine();
  GraphLoader<?> loader = engine.getLoader();
  loader.load( new File( "./process-definitions/test.wf.xml" ) );
  Graph graph = engine.getRepository().getLatestGraph( "test" );
  GraphProcess process = engine.startProcess( graph );

        /* alternately */
  MemEngine engine = new MemEngine();
  engine.getLoader().load( new File( "./process-definitions/test.wf.xml" ) );
  GraphProcess process = engine.startProcess( "test" );
If test has dependencies, and those dependencies are not yet
loaded, this load will fail. GraphLoader also has a method
to allow loading a process definition along with any dependencies that haven't
been loaded yet, or have changed. A SHA-1 hash is used to calculate if a
process definition has changed. This is stored in the customId
property of Graph.
  MemEngine engine = new MemEngine();
  XmlLoader loader = new XmlLoader();

  File basePath = new File( "./process-definitions" );
  ProcessDefinitionResolver resolver =
    new DefaultFileXmlProcessDefinitionResolver( xmlLoader, basePath );

  engine.getLoader().loadWithDependencies( "test", resolver );
  GraphProcess process = engine.startProcess( "test" );
Finally, it's often desirable to load an entire set of process definitions, or at least those that are new or require updates. This can be done as follows:
  MemEngine engine = new MemEngine();
  File basePath = new File( "./process-definitions" );
  engine.getLoader().loadNewAndChanged( new File( basePath ) );
  GraphProcess process = engine.startProcess( "test" );
The main interface for interacting with process definitions and processes is Engine.
package com.googlecode.sarasvati;
public interface Engine
{
  GraphProcess startProcess (Graph graph);
  void startProcess (GraphProcess process);
  void cancelProcess (GraphProcess process);
  void finalizeComplete (GraphProcess process);
  void finalizeCancel (GraphProcess process);
  void completeExecution (NodeToken token, String arcName);
  void completeAsynchronous (NodeToken token, String arcName );
  void executeQueuedArcTokens (GraphProcess process);
  GraphRepository<? extends Graph> getRepository ();
  GraphFactory<? extends Graph> getFactory ();
  GraphLoader<? extends Graph> getLoader ();
  void addNodeType (String type, Class<? extends Node> nodeClass );
  void fireEvent (ExecutionEvent event);
  void addExecutionListener (ExecutionListener listener, ExecutionEventType...eventTypes);
  void addExecutionListener (GraphProcess process, ExecutionListener listener, ExecutionEventType...eventTypes);
  void removeExecutionListener (ExecutionListener listener, ExecutionEventType...eventTypes);
  void removeExecutionListener (GraphProcess process, ExecutionListener listener, ExecutionEventType...eventTypes);
  ExecutionListener getExecutionListenerInstance (String type) throws WorkflowException;
  void setupScriptEnv (ScriptEnv env, NodeToken token);
}
Process definitions are stored in classes implementing the
Graph
interface.
package com.googlecode.sarasvati;

public interface Graph
{
  String getName ();
  int getVersion ();
  List<? extends Arc> getArcs ();
  List<? extends Arc> getInputArcs (Node node);
  List<? extends Arc> getInputArcs (Node node, String arcName);
  List<? extends Arc> getOutputArcs (Node node);
  List<? extends Arc> getOutputArcs (Node node, String arcName);
  List<? extends Node> getStartNodes ();
  List<? extends Node> getNodes ();
}
A Graph contains instances of
Node and Arc.
Node is where the developer can provide custom
functionality, and has the following API:
package com.googlecode.sarasvati;
public interface Node extends Adaptable
{
  String getName ();
  String getType ();
  boolean isJoin ();
  boolean isStart ();
  String getGuard ();
  Graph getGraph ();
  boolean isExternal ();
  GuardResponse guard (Engine engine, NodeToken token);
  void execute (Engine engine, NodeToken token);
}
When the engine determines that a node is ready to execute, it will follow this flow:
-
Generate a
NodeTokenpointing to that node. -
Execute the
guardfunction on the node. This will return aGuardResponse.-
The
GuardResponsecontains aGuardAction, which is an enum having valuesAcceptToken,DiscardTokenandSkipNode.
-
The
-
If the action is
AcceptToken, theexecutemethod will be called. The process will not continue until theEngine#completeExecutionmethod is invoked. It must be invoked with the name of the arcs on which to generateArcTokens. -
If the action is
DiscardToken, the token is marked complete and no further execution will take place from this set of tokens. -
If the action is
SkipNode,Engine.completeExecutionwill be called with the arc name contained in theGuardResponse.
To provide custom behavior to your nodes, you will override the
execute
method on
Node
. Sarasvati currently provides two implementations of the base
API, one memory backed and one database backed, implemented
using Hibernate. Other implementations could be made using, for
example, pure JDBC or some other persistence mechanism. There
are three base classes for nodes.
com.googlecode.sarasvati.mem.MemNodecom.googlecode.sarasvati.hib.HibNodecom.googlecode.sarasvati.CustomNode
If using only the memory backed implementation,
MemNode
should be extended. If using only the hibernate backend, nodes
should subclass HibNode.
CustomNode
can be used with either or both backends. In to store custom
attributes in the database, it uses a key/value pair table.
CustomNode
can only be used if the database mapping doesn't need to be
explicitly defined.
To demonstrate use of each implementation, we start with a node that just prints out "Hello, World". We start with the process definition.
<?xml version="1.0"?>
<process-definition
  name="hello-world"
  xmlns="http://sarasvati.googlecode.com/ProcessDefinition">

  <node name="hello" type="helloWorld" isStart="true"/>

</process-definition>
If using the memory implementation, the subclass would look like:
package com.googlecode.sarasvati.example.mem;

import com.googlecode.sarasvati.Arc;
import com.googlecode.sarasvati.Engine;
import com.googlecode.sarasvati.NodeToken;
import com.googlecode.sarasvati.mem.MemNode;

public class HelloNode extends MemNode
{
  @Override
  public void execute (Engine engine, NodeToken token)
  {
    System.out.println( "Hello, world!" );
    engine.completeExecution( token, Arc.DEFAULT_ARC );
  }
}
The hibernate version would look like:
import javax.persistence.DiscriminatorValue;
import javax.persistence.Entity;

import com.googlecode.sarasvati.Arc;
import com.googlecode.sarasvati.Engine;
import com.googlecode.sarasvati.NodeToken;
import com.googlecode.sarasvati.hib.HibNode;

@Entity
@DiscriminatorValue( "helloWorld" )
public class HelloNode extends HibNode
{
  @Override
  public void execute (Engine engine, NodeToken token)
  {
    System.out.println( "Hello, World!" );
    engine.completeExecution( token, Arc.DEFAULT_ARC );
  }
}
The hibernate version would also require an insert into the
wf_node_type table, with type, description
and behaviour. As of 1.0.0-rc3, Sarasvati will insert the
node type into the database if it's missing. However,
manually inserted the node type will not hurt anything.
insert into wf_node_type (id, description, behaviour)
 values ( 'helloWorld', 'Says hello to the world', 'helloWorld' )
The behaviour column ties the type to a discriminator specified on the subclass. This allows having multiple types with the same implementation class, if that was desired.
The backend independent version would look like:
import com.googlecode.sarasvati.Arc;
import com.googlecode.sarasvati.CustomNode;
import com.googlecode.sarasvati.Engine;
import com.googlecode.sarasvati.NodeToken;

public class HelloNode extends CustomNode
{
  @Override
  public void execute (Engine engine, NodeToken token)
  {
    System.out.println( "Hello, World!" );
    engine.completeExecution( token, Arc.DEFAULT_ARC );
  }
}
For use with the hibernate backend, a row would still need to be
added to the wf_node_type table.
insert into wf_node_type (id, description, behaviour)
 values ( 'helloWorld', 'Says hello to the world', 'custom' )
Now we can load the process into memory, or into the database.
This is done using a GraphLoader, which can
be retrieved from the appropriate engine. Before loading the
process definition, you will need to tell the engine about your
custom node types.
The steps are
Create an engine of the appropriate type
Register custom node types
Load the process definition from XML file
Get the loaded graph from the graph repository associated with the engine
Start a new GraphProcess using the graph
Here are the steps in code for the memory backed implementation.
    MemEngine engine = new MemEngine();

    // Tell engine about our custom node type
    engine.addNodeType( "helloWorld", HelloNode.class );

    // Load the process definition (this can throw LoadException or JAXBException
    // The graph will be stored in the GraphRepository for this engine
    engine.getLoader().load( "/path/to/hello-world.wf.xml" );

    // Get the graph from the GraphRepository
    Graph graph = engine.getRepository().getLatestGraph( "hello-world" );

    // start a graph process
    GraphProcess process = engine.startProcess( graph );
Here are the steps in code for the hibernate backed
implementation. It assumes that you have a means of creating a
hibernate Session object.
    Session session = ...; // get hibernate session
    HibEngine engine = new HibEngine( session );

    // Tell engine about our custom node type
    engine.addNodeType( "helloWorld", HelloNode.class );

    // Load the process definition (this can throw LoadException or JAXBException
    // The graph will be stored in the GraphRepository for this engine
    engine.getLoader().load( "/path/to/hello-world.wf.xml" );

    // Get the graph from the GraphRepository
    Graph graph = engine.getRepository().getLatestGraph( "hello-world" );

    // start a graph process
    GraphProcess process = engine.startProcess( graph );
Here are the steps in code using the backend independent custom
type with MemEngine.
    MemEngine engine = new MemEngine();

    // We can either register the type with the Engine or with the DefaultNodeFactory
    // directly.
    // Either tell the engine about our custom node type
    engine.addGlobalCustomNodeType( "helloWorld", HelloNode.class );

    // or tell the DefaultNodeFactory about the node type directly
    DefaultNodeFactory.addGlobalCustomType( "helloWorld", HelloNode.class );

    // Load the process definition (this can throw LoadException or JAXBException
    // The graph will be stored in the GraphRepository for this engine
    engine.getLoader().load( "/path/to/hello-world.wf.xml" );

    // Get the graph from the GraphRepository
    Graph graph = engine.getRepository().getLatestGraph( "hello-world" );

    // start a graph process
    GraphProcess process = engine.startProcess( graph );
The call to startProcess
will create tokens on the start nodes and will continue
executing the process until it completes or enters a wait state.
Often, custom nodes will need some information with which to do their work. Sarasvati supports this in two ways.
The schema for process definition files has a
<custom>
element which contains an
<xs:any>
element at the end of the node definition. Custom elements may
be added here. These can be automatically mapped to properties
on custom nodes.
For example, given the following custom node:
public class CustomNode extends MemNode
{
  String foo;

  public String getFoo ()
  {
    return foo;
  }

  public void setFoo (String foo)
  {
    this.foo = foo;
  }

  @Override
  public void execute (Engine engine, NodeToken token)
  {
    // do something ...
    engine.completeExecution( token, Arc.DEFAULT_ARC );
  }
}
The following process definition would load the value
test into the custom
property.
<?xml version="1.0"?>
<process-definition
  name="example1"
  xmlns="http://sarasvati.googlecode.com/ProcessDefinition">

  <node name="test" type="custom" isStart="true">
    <arc to="1"/>

    <custom>
      <foo>test</foo>
    </custom>
  </node>
</process-definition>
There several things to note with custom elements.
All custom elements must be contained within the
<custom>tag.Non-string properties on custom node types are supported.
Support for primitive types such as boolean, byte, char, short, int, long, float, double as well as their corresponding object types is built in.
Support for non-primitive types can be added
Implement
com.googlecode.sarasvati.env.AttributeConverterRegister the new mutator using the
setConverterForTypemethod (which takes a class and anAttributeConverter) oncom.googlecode.sarasvati.env.AttributeConverters.
Nested objects are supported. For example:
  <custom>
    <task>
      <name>test</name>
    </task>
  </custom>
The loader would invoke getTask().setName( ... )
on the custom node.
Attributes are also supported. How they are mapped is based on the contents of the element the attribute is on. If the element has child elements, the attribute will get mapped as a child property. If the element is itself a property, the attribute name will be combined with the element name to get the property name.
  <custom>
    <task user="pat">
      <name>test</name>
    </task>
  </custom>
This would map the
name
element value to
getTask().setName( ... )
and the
user
attribute to
getTask().setUser( ... )
.
However, the following would be mapped differently:
  <custom>
    <task user="pat">
      test
    </task>
  </custom>
This would map the text in the
task
element to
setTask( ... )
and the
user
attribute to
setTaskUser( ... )
.
You may also provide custom loading via a subclass of
NodeFactory. It has the following interface:
public interface NodeFactory
{
  Node newNode (String type) throws LoadException;
  void loadCustom (Node node, Object custom) throws LoadException;
}
The custom data may be null, a single object, or a list of
objects. The object or objects will either be elements of
org.w3c.dom.Element
or JAXB objects, if you have a JAXB mapping for your custom XML.
Instances of
NodeFactory
may be registered on
GraphLoader
.
Here we examine a more complicated example, which uses custom attributes.
<?xml version="1.0"?>

<process-definition
  name="example1"
  xmlns="http://sarasvati.googlecode.com/ProcessDefinition">

  <node name="start" isStart="true">
    <arc to="1"/>
  </node>

  <node name="1" type="task">
    <arc to="2"/>
    <arc to="3"/>

    <custom>
      <taskName>Enter order</taskName>
      <taskDesc>
        Enter order and billing info
      </taskDesc>
    </custom>
  </node>

  <node type="task" name="2">
    <arc to="4"/>

    <custom>
      <taskName>Bill Customer</taskName>
      <taskDesc>
        Bill the Customer
      </taskDesc>
    </custom>
  </node>

  <node type="task" name="3">
    <arc to="4"/>

    <custom>
      <taskName>Ship product</taskName>
      <taskDesc>
        Package and ship product
      </taskDesc>
    </custom>
  </node>

  <node type="task" name="4" joinType="labelAnd">

    <custom>
      <taskName>Market to Customer</taskName>
      <taskDesc>
        Send marketing material to customer
      </taskDesc>
    </custom>

  </node>

</process-definition>
We will need a couple of classes to represent tasks and their state. First we look at the memory based implementation.
First we have an enum for task states.
public enum TaskState { Open, Completed, Rejected }
Next is the Task class.
public class Task
{
  protected NodeToken nodeToken;
  protected String name;
  protected String description;
  protected TaskState state;

  public Task (NodeToken nodeToken, String name, String description, TaskState state)
  {
    this.nodeToken = nodeToken;
    this.name = name;
    this.description = description;
    this.state = state;
  }

  public NodeToken getNodeToken ()
  {
    return nodeToken;
  }

  public void setNodeToken (NodeToken nodeToken)
  {
    this.nodeToken = nodeToken;
  }

  public String getName ()
  {
    return name;
  }

  public String getDescription ()
  {
    return description;
  }

  public TaskState getState ()
  {
    return state;
  }

  public void setState (TaskState state )
  {
    this.state = state;
  }

  public boolean isRejectable ()
  {
    Node node = getNodeToken().getNode();
    return !node.getGraph().getOutputArcs( node, "reject" ).isEmpty();
  }
}
In our simple example, we need some way of tracking which tasks have been created.
public class TaskList
{
  protected static List<Task> tasks = new LinkedList<Task>();

  public static List<Task> getTasks ()
  {
    return tasks;
  }
}
Finally, the custom node for generating tasks
public class TaskNode extends MemNode
{
  protected String taskName;
  protected String taskDesc;

  public String getTaskName ()
  {
    return taskName;
  }

  public void setTaskName (String taskName)
  {
    this.taskName = taskName;
  }

  public String getTaskDesc ()
  {
    return taskDesc;
  }

  public void setTaskDesc (String taskDesc)
  {
    this.taskDesc = taskDesc;
  }

  @Override
  public void execute (Engine engine, NodeToken token)
  {
    Task newTask = new Task( token, getTaskName(), getTaskDesc(), TaskState.Open );
    TaskList.getTasks().add( newTask );
  }
}
When a task node is executed, it will create new
Task
instance and add it to a task list. A task can be completed or
rejected as seen in the following code snippet:
      Task t = ...;

      if ( isCompletion )
      {
        t.setState( TaskState.Completed );
        engine.completeExecution( t.getNodeToken(), Arc.DEFAULT_ARC );
      }
      else if ( isReject && t.isRejectable() )
      {
        t.setState( TaskState.Rejected );
        engine.completeExecution( t.getNodeToken(), "reject" );
      }
The primary difference with the database/Hibernate version, is
that the node and tasks will require database backing. Let us
look at the TaskNode class.
@Entity
@DiscriminatorValue( "task" )
@SecondaryTable( name="wf_node_task", pkJoinColumns=@PrimaryKeyJoinColumn(name="id"))
public class TaskNode extends HibNode
{
  @Column (name="name", table="wf_node_task")
  protected String taskName;

  @Column (name="description", table="wf_node_task")
  protected String taskDesc;

  public TaskNode() { /* Default constructor for Hibernate */ }

  public String getTaskName ()
  {
    return taskName;
  }

  public void setTaskName (String taskName)
  {
    this.taskName = taskName;
  }

  public String getTaskDesc ()
  {
    return taskDesc;
  }

  public void setTaskDesc (String taskDesc)
  {
    this.taskDesc = taskDesc;
  }

  @Override
  public void execute (Engine engine, NodeToken token)
  {
    HibEngine hibEngine = (HibEngine)engine;

    Session session = hibEngine.getSession();

    TaskState open = (TaskState)session.load( TaskState.class, 0 );
    Task newTask = new Task( (HibNodeToken)token, getTaskName(), getTaskDesc(), open );
    session.save( newTask );
  }
}
It is often useful to track state associated with a process or tokens. Sarasvati
provides several environments in which state can be placed. Some environments
are defined solely by the contents of a process definition, and are therefore
readonly. Readonly environments are represented by the
ReadEnv
interface. Most environments are read-write and are represented by the
Env interface,
which extends from ReadEnv.
The Env interface supports both persistent and transient attributes.
Table 4.11. Environment Attribute Types
| Type | Behavior |
|---|---|
| Persistent |
Must be serializable to the database. All primitives and object version of the primitives, as
well as String and Date are supported by default. Support for other types may be added
by defining an AttributeConverter,
which is then registered with the
AttributeConverters class,
using the setConverterForType method.
|
| Transient | Transient attributes are only stored as long as the process is in memory. They are a convenient places to cache values during process execution. Because they aren't persisted to a database, there is no restriction on what types can be stored. |
A process environment is read-write and is shared across an entire process.
  GraphProcess p = ...;
  Env env = p.getEnv();
  env.setAttribute( "foo", "test" );
  env.setAttribute( "bar", 5 );
  String foo = env.getAttribute( "foo" );
  int bar = env.getAttribute( "foo", Integer.class );
The node token environment is read-write. Node token state is only visible to the given token, however tokens inherit the environment of their parents. Token state is initialized using the following rules:
If a token has no parents, it will start with an empty environment.
If a token has one parent, it will inherit the environment of its parent.
When a child token inherits the environment of it's parent, it may point directly to the parent's environment, until the child writes to the environment, at which point the environment will be copied. This means that if the parents writes to the environment after children have been created, and the children have not written to their environments, these changes will be visible to the children.
If a token has multiple parents parent, it will inherit the environment of its parent.
If a token has multiple parents parent with overlapping attribute names, the child environment wil get one the value from one of the parents, generally whichever is merged into the child environment last.
  NodeToken t = ...;
  Env env = t.getEnv();
  env.setAttribute( "foo", "test" );
  env.setAttribute( "bar", 5 );
  String foo = env.getAttribute( "foo" );
  int bar = env.getAttribute( "foo", Integer.class );
To read from both the process and node token environments, use the
NodeToken#getFullEnv() method. It will return
an Env which will read first from node token environment
and, if no attribute is defined there, read from the process environment.
All writes will affect the node token environment.
This is implemented using NestedEnv, which can be used to stack any combination of environments.
When working with token sets, there are two environments available.
An environment shared by all tokens in the token set
An environment specific to each member index. For example, if a token set is generated with three members, then the first token will have index
0, the second with have index1and the third will have index2. Any tokens generated from the first token will also have index0, until such point as the token set is joined and is marked complete.
To see how token set environments are used, take as an example an approval process. The token set is generated as follows:
Map<String,List<?>> initialMemberEnv = new HashMap<String, List<?>>();
String[] groups = new String[] { "Accounting",
                                 "Security",
                                 "Operations" };
initialMemberEnv.put( "group", Arrays.asList( groups ) );

Env tokenSetEnv = new MapEnv();
tokenSetEnv.setAttribute( "deadline", 3 );

engine.completeWithNewTokenSet(
    token,           // the token being completed
    Arc.DEFAULT_ARC, // the name of the arc(s) to exit on
    "approvals",     // name to give the new token set
    3,               // number of tokens to generate on each arc
                     // with the given name
    true,            // completing asynchronously
    tokenSetEnv,     // initial token set env
    initialMemberEnv // token set member env
  );
This generates a token set with three tokens in it. They all share a common deadline
attribute, but each will see a different value for the group attribute. These
attributes can be access from the tokens in the token set as follows:
// Access the token set environment
Env setEnv = token.getTokenSet( "approvals" ).getEnv();
int deadline = setEnv.getAttribute( "deadline", Integer.class );

// Access the environment specific to this token within the token set
Env env = token.getTokenSetMember( "approvals" ).getEnv();
String group = env.getAttribute( "group" );
When defining an external in a process definition, attributes may be defined
for that external. Those attributes will be visible to nodes in the referenced
external.
In the following process definition, when node A is executed,
it will print out the values defined for attributes named foo
and bar. If the process definition were executed directly,
both values would be undefined.
<process-definition
  name="external-env-one"
  xmlns="http://sarasvati.googlecode.com/ProcessDefinition">

  <node name="A" type="script">
    <custom>
      <execute type="js">
        var env = token.getNode().getExternalEnv();
        System.out.println( "foo: " + env.getAttribute( "foo" ) );
        System.out.println( "bar: " + env.getAttribute( "bar" ) );
      </execute>
    </custom>
  </node>
</process-definition>
Process definition external-env-one can be included in external-env-two,
as demonstrated below. If executed, foo would now have the value
hello and bar would have the value world.
<process-definition
  name="external-env-two"
  xmlns="http://sarasvati.googlecode.com/ProcessDefinition">

  <node name="B">
    <arc external="one" to="A"/>
  </node>

  <external name="one" processDefinition="external-env-one">
    <custom>
      <foo>hello</foo>
      <bar>world</bar>
    </custom>
  </external>

</process-definition>
The values defined for externals can be overriden. This can happen when the proces definition which
defines the external is itself references as an external, as below. Now, foo
will have the value goodbye, while bar will retain the
value world.
<process-definition
  name="external-env-three"
  xmlns="http://sarasvati.googlecode.com/ProcessDefinition">

  <node name="C" isStart="true">
    <arc external="two" to="B"/>
  </node>

  <external name="two" processDefinition="external-env-two">
    <custom>
      <foo>goodbye</foo>
    </custom>
  </external>

</process-definition>
It is often useful to have a callback mechanism for various events in the execution of the workflow. Sarasvati allows registering listeners either globally or per-process. Support for specifying listeners per-graph will be forthcoming.
Execution listeners must implement the ExecutionListener interface. Because execution listeners may be added to processes that are serialized to a database, there are some rules around how they should be built.
Execution listeners are stored in the database simply by classname. They must therefore have a public default constructor.
Instances of an execution listeners may be shared across threads and should therefore be thread-safe. For performance reasons, they should ideally be stateless, allowing them to be unsychronized.
Here is an example listener which prints out events as they occur.
package com.googlecode.sarasvati.example;

import com.googlecode.sarasvati.event.EventActions;
import com.googlecode.sarasvati.event.ExecutionEvent;
import com.googlecode.sarasvati.event.ExecutionListener;

public class LoggingExecutionListener implements ExecutionListener
{
  @Override
  public EventActions notify (final ExecutionEvent event)
  {
    System.out.println( event.getEventType() + ": " +
                        " Process: " + event.getProcess() +
                        " NodeToken: " + event.getNodeToken() +
                        " ArcToken: " + event.getArcToken() );
    return null;
  }
}
This listener could be register for all processes as follows:
// Add listener for all event types
engine.addExecutionListener( LoggingExecutionListener.class );

// Add listener for only the arc token and node token completed events
engine.addExecutionListener( LoggingExecutionListener.class,
                             ExecutionEventType.ARC_TOKEN_COMPLETED,
                             ExecutionEventType.NODE_TOKEN_COMPLETED );
One can also specify a particular process to listener to.
// Add listener for all event types
engine.addExecutionListener( process, LoggingExecutionListener.class );

// Add listener for only the arc token and node token completed events
engine.addExecutionListener( process, LoggingExecutionListener.class,
                             ExecutionEventType.ARC_TOKEN_COMPLETED,
                             ExecutionEventType.NODE_TOKEN_COMPLETED );
Listeners aren't limited to a passive. In some cases they may
affect workflow processing by returning a
EventActions with an appropriate
EventActionType. The actions that may be
taken are:
An execution listener may prevent a process that is in pending complete state from moving to complete state. This is to allow end of workflow processing to happen asynchronously.
Similarly, an execution listener may prevent a process that is in pending cancel state from moving to cancelled state.
An execution listener may prevent a node token that has just been accepted into a node from executing. This may be used to implement delayed node execution based on timer.
Here is a listener that creates and returns EventActions.
public class DelayExecutionListener implements ExecutionListener
{
  @Override
  public EventActions notify (final ExecutionEvent event)
  {
    if ( event.getEventType() ==
         ExecutionEventType.PROCESS_PENDING_COMPLETE )
    {
      return new EventActions(
        EventActionType.DELAY_PROCESS_FINALIZE_COMPLETE );
    }
    return null;
  }
}
In graph based workflow, execution proceeds forward from node to node along directed arcs. However, it happens that we wish to allow execution to return to nodes where it has already been. Sometimes this is done because some action needs to be performed repeatedly. Other times, it's because something has gone wrong, and we need to go back to an earlier point to fix things and go back through the process. Here we focus primarily on the second case, and look at different ways of accomplishing this.
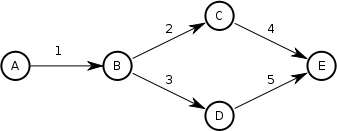
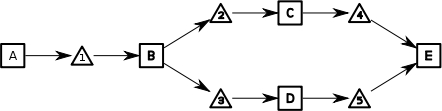
Here is a simple, linear workflow:

In this case, there is only one progression that can be made. Using
squares for node tokens and triangles for arc tokens, the resulting
execution looks like:

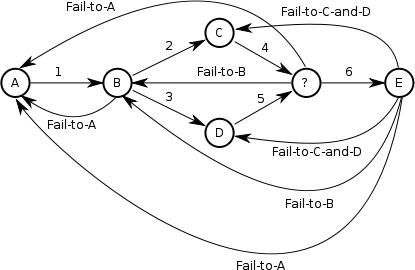
What if we wish to let a user choose to send the workflow backwards,
instead of forwards, say to fix a mistake made earlier. If we
wanted to be able to go back, we'd have to set up arcs going
backwards. Assuming, we want maximum flexibility, we'd end up with
a process definition that looked like:
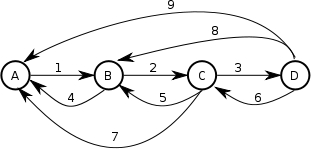
Now we could go from A to B to C, back to B to C to D, back to B to C to
D and done. The execution would look like:

Note that the arc tokens now display the arc name.
We have gained flexibility, but at the cost of making the workflow much more complex. The number of arcs has tripled. What if instead, we could use the existing arcs? After all we know where we've been, and we just wish to go back to a previous good state. So, rather than having to make explicit arcs that go back to all conceivable previous states, we can just backtrack. In other words we can just trace our footsteps backwards to where we were.
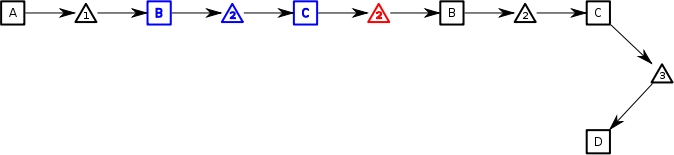
So, lets says we've gotten up to C. At this point, the process execution history looks like:

Now we wish to backtrack to B. If we
retrace our steps, the process history will now look like:

Note that when we traverse arc 2
backward, it's marked in red. This is to mark that we've gone
backwards along that arc. The node tokens on B
and C, as well as the forward moving arc token on
2 are also marked, but in blue. This is to
note that these actions have been backtracked. When node tokens are
backtracked, they are given the opportunity to undo whatever work
they did, send out notifications, or do whatever else is required.
We can now move forward again, this time going up to D, where the process execution history looks like:
If from here, we once again wish to return to B, the
execution history will look like:
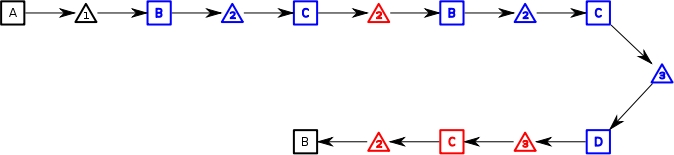
Note that since we are somewhat literally retracing our steps, to
get from D to B
we created backwards tokens at arc 3,
node C and arc 2.
The corresponding forward tokens have been marked as
backtracked.
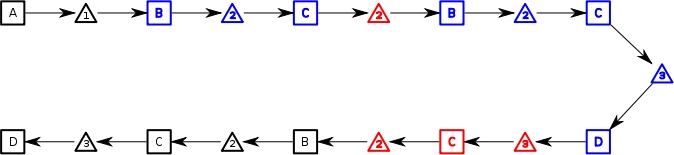
From here we now finish, and go to the end.
Let us now examine a process definition which has splits and joins.
These complicate manual backtracking a great deal.
If one has multiple, concurrent node tokens active after a split, backtracking one of them means that all must be backtracked. The one which has been backtracked must out and find all incomplete concurrent tokens and complete them. It must also set a marker indicating that backtracking should occur. All the tokens must then first be collected by an intermediary node, which will test to see if a backtrack is required. It will then send execution forward or back based on this test.
If all tokens which were generated from the split aren't collected and sent back as a single token then each token sent back to the split will generate a new set of tokens from the split. This could cause many duplicates to be generated.
Here is an example of a graph which would be roughly equivalent to the previous graph, but allows manual backtracking.
It has a great deal many more arcs, as well as a more complicated
structure, to accommodate backtracking to the split.
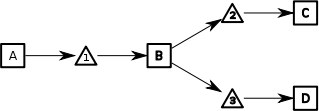
To see how automated backtracking would work, let us first progress from A to B to where both C and D are open.
We can now attempt to backtrack to B.
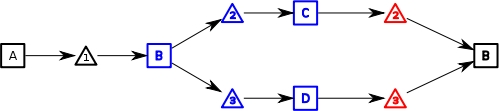
The engine will follow all execution history which emanated from
B and attempt to reverse it. So we can see
that it flows backwards from C and
D backwards to B.
If we now attempt to backtrack one more step to A, the execution history will look like:

Though this appears to be a simple linear backtrack, it's actually
slightly complicated. The history starting from A
includes the backtracking we just did. So the engine must traverse
this to get to the current active tokens and backtrack them.
If instead, we were to backtrack directly from when C and D were open, back to A, the execution history would look as follows:

It looks almost the same, except that the second B
is marked as a backwards execution, since this time, we went
straight across it, instead of stopping there, and then continuing
backwards.
We'll use the same process definition as we used for demonstrating splits.
Going back from a join is both more and less problematic than a split. A
join can act as a split and send tokens back all of its inputs.
However, it is very difficult to go back to just one of the
inputs. If only one of the join inputs is reactivated, then the
join will never fire, since it won't have all the required inputs
available.
To start off with, assume execution has proceeded to E and the execution history looks like:
If we then want to go back to when C
was open, the process will now look like:

As expected, C is now open. To do so,
we backtracked across arc 4. However,
D is not open but there is an open arc
token on 5. We only wanted C
open, not D. However, when C
completes, we want E to execute again. However,
E will only execute if there are arc tokens
waiting on arcs 4 and 5.
So, we backtrack arc 5, but the arc token we
create on 5 is left active. Now when
C completes, E
will execute as it will have arc tokens on all inputs.
The arc token on 5, marked in yellow, is called a u-turn since this is what it does. It backtracks onto an arc, but then turns around and goes right back.
If we complete C the process will look like:

If instead of completing C we backtracked
to D as well, the process would now look like:

The u-turn arc token is now marked as backtracked and a node token
is now active on D .
Backtracking is very easy to use in Sarasvati.
To backtrack, invoke the backtrack(NodeToken token)
method on your Engine instance.
  /**
   * Backtracks execution to the point where the given
   * node token was active. The token must be complete
   * and must not have been backtracked before. If it's
   * not complete, there isn't any point in backtracking
   * to it. If it has already been backtracked, the
   * execution has either returned to a point previous
   * to that token, or there is a newer, non-backtracked
   * token at that node now.
   *
   * @param token The destination token to backtrack to.
   */
  void backtrack (NodeToken token);
Your custom node classes may override the isBacktrackable
and backtrack methods on Node .
Node#isBacktrackable will control whether a given invocation of
Engine#backtrack will succeed. Sometimes, business logic may
require that certain actions not be repeated.
Node#backtrack gives a place to to undo the the
results of your custom node logic, and/or send notifications. This
method will not be invoked until after isBacktrackable
has returned true for all nodes needing to be backtracked.
  /**
   * Returns true if the specific execution of
   * this Node by the given NodeToken can be
   * backtracked.
   *
   * @param engine The engine doing the backtracking
   * @param token The token being backtracked
   * @return True if the node can be backtracked, false otherwise.
   */
  boolean isBacktrackable (Engine engine, NodeToken token);

  /**
   * Does whatever work is necessary to backtrack
   * this execution. For example, a task node may
   * send a notification that the task has been
   * backtracked.
   *
   * @param engine The engine doing the backtracking
   * @param token The specific token being backtracked.
   */
  void backtrack (Engine engine, NodeToken token);
Here is an example of how backtracking might be invoked. This example assumes we want to backtrack to an ancestor of the current token located at a node named Check Inventory.
  String name = "Check Inventory";
  NodeToken ancestor =
    FindNodeNamedVisitor.findFirstNamedParent( token, name );
  engine.backtrack( ancestor );
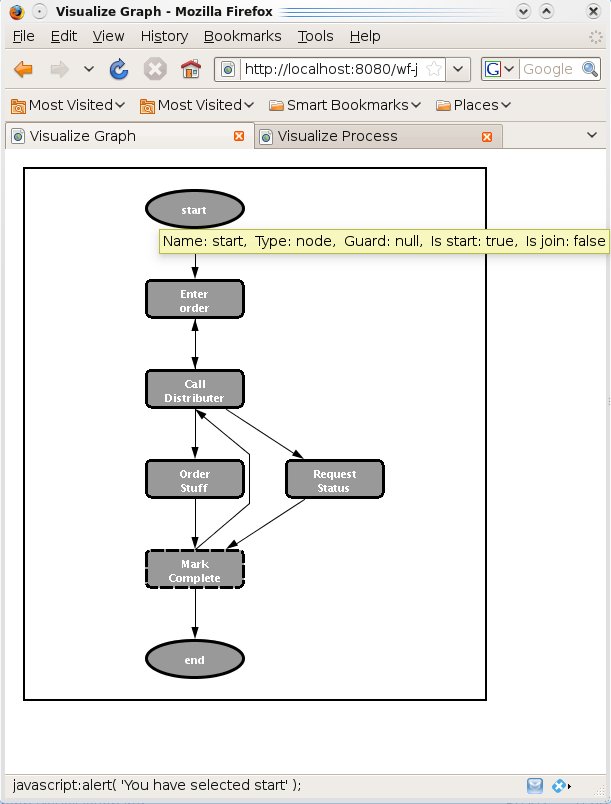
Sarasvati offers the ability to generate an HTML image map of a process definition.
The most convenient way to create process definition image maps is
to use the GraphImageMapCreator class. This is
used in conjunction with an instance of GraphToImageMap,
which is used to help render the image and image map.
GraphImageMapCreator API
-
getMapContents() - The text which should go into a
maptag - getImage () - The graph image
- writeImageToFile() - Convenience method to write the graph image to a file
The GraphToImageMap provides the following
to GraphImageMapCreator.
-
The
Iconused to render each node - The link for each node and arc
- The hover text for each node and arc
- A preference whether or not arc labels are rendered
GraphToImageMapAdapter is a implementation
of GraphToImageMap which provides default
implementations of each of the methods.
Its use is demonstrated here, as it could be used in a JSP file.
<%
  String basePath =
    config.getServletContext().getRealPath( "/" );

  HibEngine hibEngine = new HibEngine( hibSession );
  GraphRepository repo = hibEngine.getRepository();
  Graph graph = repo.getLatestGraph( "embedded-task-rej" );

  GraphToImageMapAdapter helper =
    new GraphToImageMapAdapter()
  {
    public String hrefForNode (Node node)
    {
      return "javascript:alert( 'You have selected " +
             node.getName() + "' );";
    }

    public String hoverForNode (Node node)
    {
      return "Name: " + node.getName() +
             ",  Type: " + node.getType() +
             ",  Guard: " + node.getGuard() +
             ",  Is start: " + node.isStart() +
             ",  Is join: " + node.isJoin();
    }
  };

  GraphImageMapCreator imageMapCreator =
    new GraphImageMapCreator( graph, helper );
  String name =  basePath + "/test.gif";
  imageMapCreator.writeImageToFile( "gif", name );
%>

  <map name="graphMap">
    <%=imageMapCreator.getMapContents()%>
  </map>

  <div style="margin-left:10px; padding-top:10px">
    <image style="border:2px black solid"
           src="<%=request.getContextPath()%>/test.gif"
           usemap="#graphMap"/>
  </div>
The resulting page would look something like:
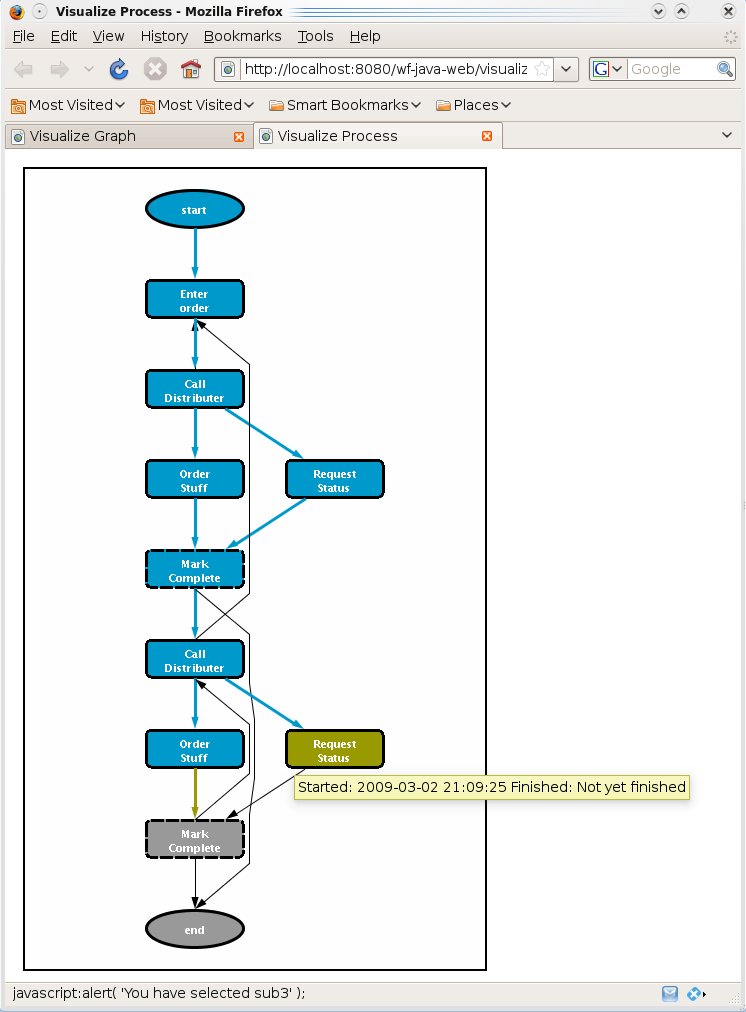
Sarasvati offers the ability to generate an HTML image map of a process.
The API for process visualizations is almost exactly the same as
that for graph visualizations. The difference is that when
visualizing we are dealing with instances of Node
and Arc, whereas with processes, we have instances of
VisualProcessNode and VisualProcessArc.
A VisualProcessNode wraps a Node
as well as a NodeToken, which may be null, since not
every Node may have been executed.
When doing process visualization, one would use the
ProcessImageMapCreator,
ProcessToImageMap and
ProcessToImageMapAdapter classes,
rather than the graph analogues.
Its use is demonstrated here, as it could be used in a JSP file.
<%
  String basePath =
    config.getServletContext().getRealPath( "/" );

  HibEngine hibEngine = new HibEngine( hibSession );
  GraphRepository repo = hibEngine.getRepository();
  GraphProcess process = repo.findProcess( 1 );

  final SimpleDateFormat sdf =
    new SimpleDateFormat( "yyyy-MM-dd HH:mm:ss" );

  ProcessToImageMapAdapter helper =
    new ProcessToImageMapAdapter ()
  {
    public String hrefForNode (VisualProcessNode node)
    {
      return "javascript:alert( 'You have selected " +
                                node.getNode().getName() +
                                "' );";
    }

    public String hoverForNode (VisualProcessNode node)
    {
      NodeToken token = node.getToken();
      if ( token == null )
      {
        return null;
      }
      String start = sdf.format( token.getCreateDate() );
      String end = (token.getCompleteDate() == null ?
                      "Not yet finished" :
                      sdf.format( token.getCompleteDate() ) )
      return "Started: " + start +
             " Finished: " + end;
      }
    };

    ProcessImageMapCreator imageMapCreator =
      new ProcessImageMapCreator( process, helper );
    imageMapCreator.writeImageToFile( "gif", basePath + name );
%>

  <map name="processMap">
    <%=imageMapCreator.getMapContents()%>
  </map>

  <div style="margin-left:10px; padding-top:10px">
    <image style="border:2px black solid"
           src="<%=request.getContextPath()%>/test.gif"
           usemap="#processMap"/>
  </div>
The resulting page would look something like:
Sarasvati allows graphs to be validated as they are constructed. The GraphValidator interface allows validation to be performed at two points:
-
After the process definition has been loaded into memory, but before a
Graphhas been constructed. -
After a
Graphinstance has been constructed, but before it is added to theGraphRepository.
Implementers of the GraphValidator may choose whether to validate nodes and arcs
individually, or inspect the process definition as a whole.
Implements will usually subclass
GraphValidatorAdapter,
and only override the methods they need. Here is an example validator which looks at the guards on
node definitions before the Graph is constructor and check the start nodes afterwards.
public class ExampleGraphValidator extends GraphValidatorAdapter
{
  public void validateNodeDefinition (final NodeDefinition nd)
    throws SarasvatiLoadException
  {
    if ( nd.getGuard() != null && !nd.getGuard().isEmpty() )
    {
      if ( !GuardValidator.isGuardValid( nd.getGuard() )
      {
        throw new SarasvatiLoadException(
          "The guard defined for node " + nd.getName()  +
          " failed validation." );
      }
    }
  }

  public void validateGraph (final Graph graph)
    throws SarasvatiLoadException
  {
    List<? extends Node> startNodes = graph.getStartNodes();
    if ( startNodes.size() != 1 ||
        !"validate-order".equals( startNodes.get( 0 ).getType() ) )
    {
      throw new SarasvatiLoadException(
        "Process definition " + graph.getName() +
        " does not start with validte order node. " +
        "Policy dictates that all " +
        "workflows must start with a " +
        "validate order node" );
    }
  }
}
This graph validator could now be used by passing it into the
getLoader method of Engine
as follows:
  MemEngine engine = new MemEngine();
  File basePath = new File( "./process-definitions" );
  GraphValidator val = new ExampleGraphValidator();
  GraphLoader<?> loader = engine.getLoader( val );
  loader.loadNewAndChanged( new File( basePath ) );
  GraphProcess process = engine.startProcess( "test" );